Tired of your garage door remote acting up? Learn how to replace a garage door opener battery correctly and keep your garage access seamless and stress-free.
Garage door opener remotes are essential for secure and convenient access to your home. But when the battery dies, it can leave you locked out or struggling with unresponsive controls. Knowing how to replace a garage door opener battery properly is a quick fix that saves you time, hassle, and money.
Replacing your battery ensures your remote continues to communicate reliably with the opener. Maintaining your remote is part of basic home care, whether you use a LiftMaster and Genie opener.
Spot the Signs: When It’s Time to Replace Your Garage Door Opener Battery
Your garage door opener is something you likely use every day without giving it much thought—until it stops working. Before you start unscrewing the remote or assuming there’s a major issue with the opener, it’s smart to check whether the battery needs replacing. Catching the early signs of a weak battery can save you from being stuck outside—or inside—your garage at the worst possible time.
So, how do you know when to swap out the battery? Look for these common warning signs:
- Inconsistent Performance: If your remote works only some of the time, or the garage door opens and closes sporadically, it’s a clear signal that something’s off. A weak battery can cause erratic behavior before it completely dies.
- Dim or Dead LED Indicator: Most garage door remotes have a small LED light that lights up when you press the button. If the light is dim, flickers, or doesn’t turn on at all, the battery is likely running low.
- Delayed Response: You press the button and nothing happens. Or maybe you press it multiple times before the door finally responds. This lag is a telltale sign that the battery isn’t providing enough power.
- Complete Failure: If the remote suddenly stops working and all other signs point to normal function (like the wall-mounted button still works), then the battery is probably drained entirely.
Recognizing these symptoms early can help you avoid the hassle of being locked out or having to operate the garage door manually. A battery swap is quick and inexpensive and can restore your remote’s performance instantly.
In short, don’t wait until you’re stuck outside in the rain, juggling groceries and pressing a dead remote repeatedly. Keep a spare battery on hand, and take a proactive approach to home maintenance—especially when it comes to convenience and access.
Step-by-Step: How to Replace Garage Door Opener Battery Safely and Correctly
Understanding how to replace a garage door opener battery the right way depends on the type of remote you own. Most modern remotes from brands like LiftMaster, Genie, and Craftsman follow a similar process:
Check the Battery Type
Before you begin, it’s important to determine what type of battery your remote uses. Most garage door opener remotes either use coin-style batteries, such as the CR2032 or CR2025, or standard AA or AAA alkaline batteries.
- Check the user manual: The manufacturer’s manual will usually specify the correct battery type and size.
- Inspect the remote: If you no longer have the manual, you can open the remote to check the battery directly. The battery type and voltage are often printed on the battery itself.
Knowing the correct battery ensures you buy the right replacement before taking the remote apart.
Open the Remote Carefully
To access the battery compartment, you’ll need to open the remote. This step should be done gently to avoid damaging the remote’s casing or internal components.
- Flip the remote over so you can inspect the back.
- Look for a small slot, seam, or screw that holds the remote casing together.
- If there’s a slot, use a flat-head screwdriver, coin, or similar tool to gently pry the remote open. Insert the tool into the slot and twist it slowly until the casing starts to pop apart.
- If your remote uses a screw, use a small Phillips-head screwdriver to remove it before separating the casing.
Tip: Work on a clean, flat surface so you don’t lose any small parts.
Remove the Old Battery
Once the remote is open, you should see the battery or batteries inside.
- Pay attention to orientation: Before removing anything, note which direction the battery is installed—look for the + (positive) and – (negative) signs.
- Carefully lift the old battery out of its compartment. You may be able to use your fingernail or a small tool to gently pop it out.
- Avoid bending or damaging the battery contacts inside the remote. These metal connectors are important for the new battery to function properly.
Dispose of the old battery according to your local recycling or disposal regulations.
Insert the New Battery
With the old battery removed, it’s time to install the new one.
- Make sure the new battery matches the old one exactly in size, type, and voltage.
- Insert it in the same orientation as the original. Double-check the polarity to avoid damaging the remote.
- Gently press the battery into place, ensuring it sits firmly and makes contact with the metal terminals.
If the battery feels loose, reposition it until it fits securely.
Reassemble the Remote
Once the new battery is installed, reassemble the remote.
- Align the two halves of the remote casing and press them together until they snap securely into place.
- If there was a screw, replace it and tighten it gently—don’t overtighten or you might strip the threads.
Give everything a quick once-over to ensure it looks the way it did before you opened it.
Test the Remote
Now that everything is back together, it’s time to see if the replacement worked.
- Stand near your garage and press the button on the remote.
- The new garage door should respond immediately. If not, double-check the battery orientation or try another new battery in case the first one was defective.
If the remote still doesn’t work after trying a second battery, there may be an issue with the remote or the opener itself, and you might need to consult the manufacturer or consider a replacement.
Extra Tips for Long-Term Remote Reliability
To make sure your garage door opener remote keeps performing at its best, here are a few practical tips to help maintain its reliability and extend its lifespan:
1. Use Quality, Brand-Name Batteries
Opt for trusted battery brands like Duracell, Energizer, or Panasonic. Generic or off-brand batteries may not last as long or perform as consistently, especially in extreme temperatures. Investing in quality batteries can save you time and hassle down the road.
2. Store the Remote in a Safe, Dry Place
Avoid leaving your remote in areas where it’s exposed to moisture, heat, or direct sunlight—like a dashboard or windowsill. Prolonged exposure to the elements can cause internal damage or shorten the battery’s lifespan.
3. Replace Batteries Annually or at the First Sign of Lag
Even if your remote still works, a weak battery can lead to intermittent signal issues or delayed response. Make it a habit to replace the battery once a year, or sooner if you notice a slower or weaker response when pressing the button.
4. Keep a Spare Battery Handy
Avoid the frustration of a dead remote at the worst possible moment by keeping an extra battery in a drawer, glove compartment, or toolbox. You’ll thank yourself when the time comes.
5. Clean the Remote Occasionally
Dust and dirt can accumulate around the buttons or inside the battery compartment. Every few months, wipe down the remote with a soft, dry cloth and gently clean around the buttons to prevent grime from affecting performance.
Consistency in these small maintenance habits can go a long way toward ensuring your garage door opener remote is always ready when you need it. Reliable access to your garage starts with a well-cared-for remote!
Troubleshooting: What If Replacing the Battery Doesn’t Work?
If replacing the battery didn’t solve the issue, there are still a few steps you can take before giving up on your remote. Here’s what to try next:
Try Reprogramming the Remote
Sometimes the remote loses its connection to the opener after a battery change or power outage. Check your opener’s user manual for reprogramming steps. Most units have a “Learn” or “Program” button on the motor housing. Press that button, then press the remote button to sync. If the opener light flashes or the door responds, the remote is now reconnected.
Check the Wall Button and Safety Sensors
Press the wall-mounted garage door opener button. If it works, the issue likely lies with the remote. If neither the remote nor the wall button work, the problem may be with the opener itself. Also inspect the safety sensors near the bottom of the door—dirty or misaligned sensors can stop the opener from responding.
Inspect the Remote for Physical Damage
Look closely at the remote for cracks, signs of water damage, or corrosion in the battery compartment. Dirty or rusted battery contacts may be the culprit. Clean them carefully with a cotton swab and rubbing alcohol if needed. If internal components are damaged, the remote may need to be replaced.
Test a Spare Remote
If you have a second remote, try using it. If the spare works, you’ve confirmed the issue is with the original remote. If neither remote works, the opener system itself may require attention.
If the remote still doesn’t work after reprogramming, cleaning, or testing with a spare battery, it might be time for a replacement. Most new remotes are affordable and easy to pair with your system. If you’re unsure or suspect the opener is the problem, call a garage door technician for professional garage door repair.
FAQs About Garage Door Remote Batteries
How long should a garage door remote battery last?
A garage door remote battery typically lasts between 1 to 2 years, depending on how frequently you use the remote. If the remote is used multiple times daily, the battery may drain faster.
What is the most common battery for garage remotes?
The most common battery used in garage door remotes is the CR2032 lithium coin cell. However, some remotes may use other types like the A23 12-volt battery. Always check your remote’s manual or the old battery itself for the exact type. Using the correct battery ensures proper function and longevity of the remote.
How do I know if my garage door remote needs a new battery?
Signs that your garage door remote needs a new battery include delayed response, reduced range, or the door not opening at all. Sometimes the LED indicator light may become dim or stop lighting up when you press a button. Replacing the battery is often a quick fix. If the remote still doesn’t work after changing the battery, the issue might be elsewhere.
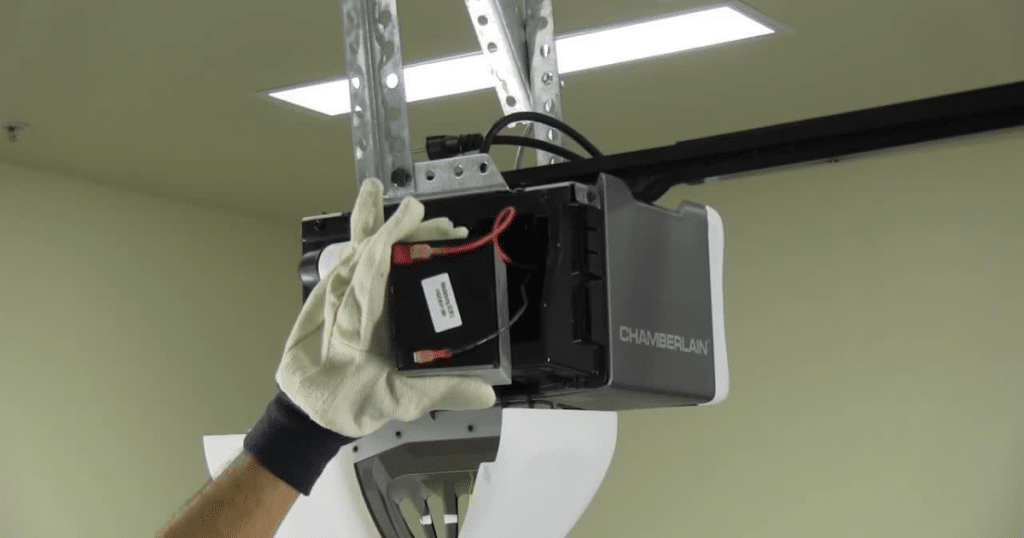
How important is battery backup for garage door opener?
Battery backup is very important, especially during power outages. It ensures you can still open and close your garage door, which is crucial for safety and convenience.
How often do you need to replace a garage door battery?
Garage door remote batteries generally need replacing every 1 to 2 years. However, usage frequency and battery type can impact this timing. If you notice your remote is less responsive, it’s a good idea to change the battery. Regular maintenance can prevent getting locked out unexpectedly.
Conclusion
Learning how to replace a garage door opener battery the right way can save you a lot of stress. It’s a small maintenance task that greatly impacts your daily routine. By staying on top of battery life, you ensure consistent access and avoid unexpected issues.
Do you need help or a reliable garage door partner in your area? DoorJam Garage Repair is your go-to solution for maintenance, battery replacement, and more.
End Note
DoorJam Garage Repair provides expert service tailored to your garage door needs. We specialize in working with top brands like LiftMaster and Genie to deliver dependable, long-lasting solutions.
Homeowners in Durham, Raleigh, and Wake Forest trust our skilled technicians for everything from routine maintenance to emergency garage door repairs. Our quick response times and personalized care ensure your garage operates smoothly year-round.
Explore our About Us page to learn more about our mission and values. Ready for expert help? Contact us today, and don’t forget to follow us on Instagram and Facebook for garage tips and local updates.